Scroll down for the French translation – Faites défiler l’écran vers le bas pour voir la traduction française de l’article.
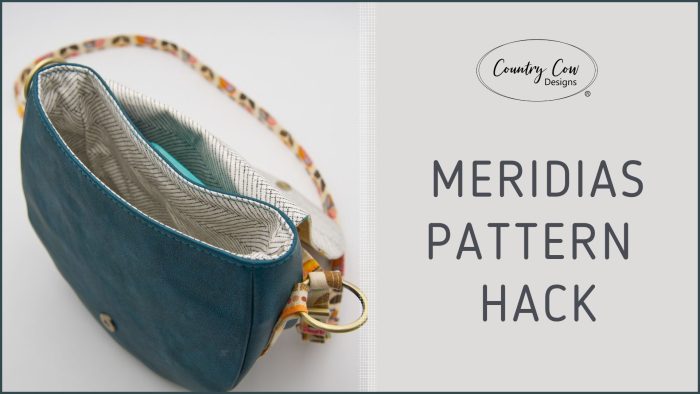
You all know how much I love Amy from BedHogShop’s bag making!
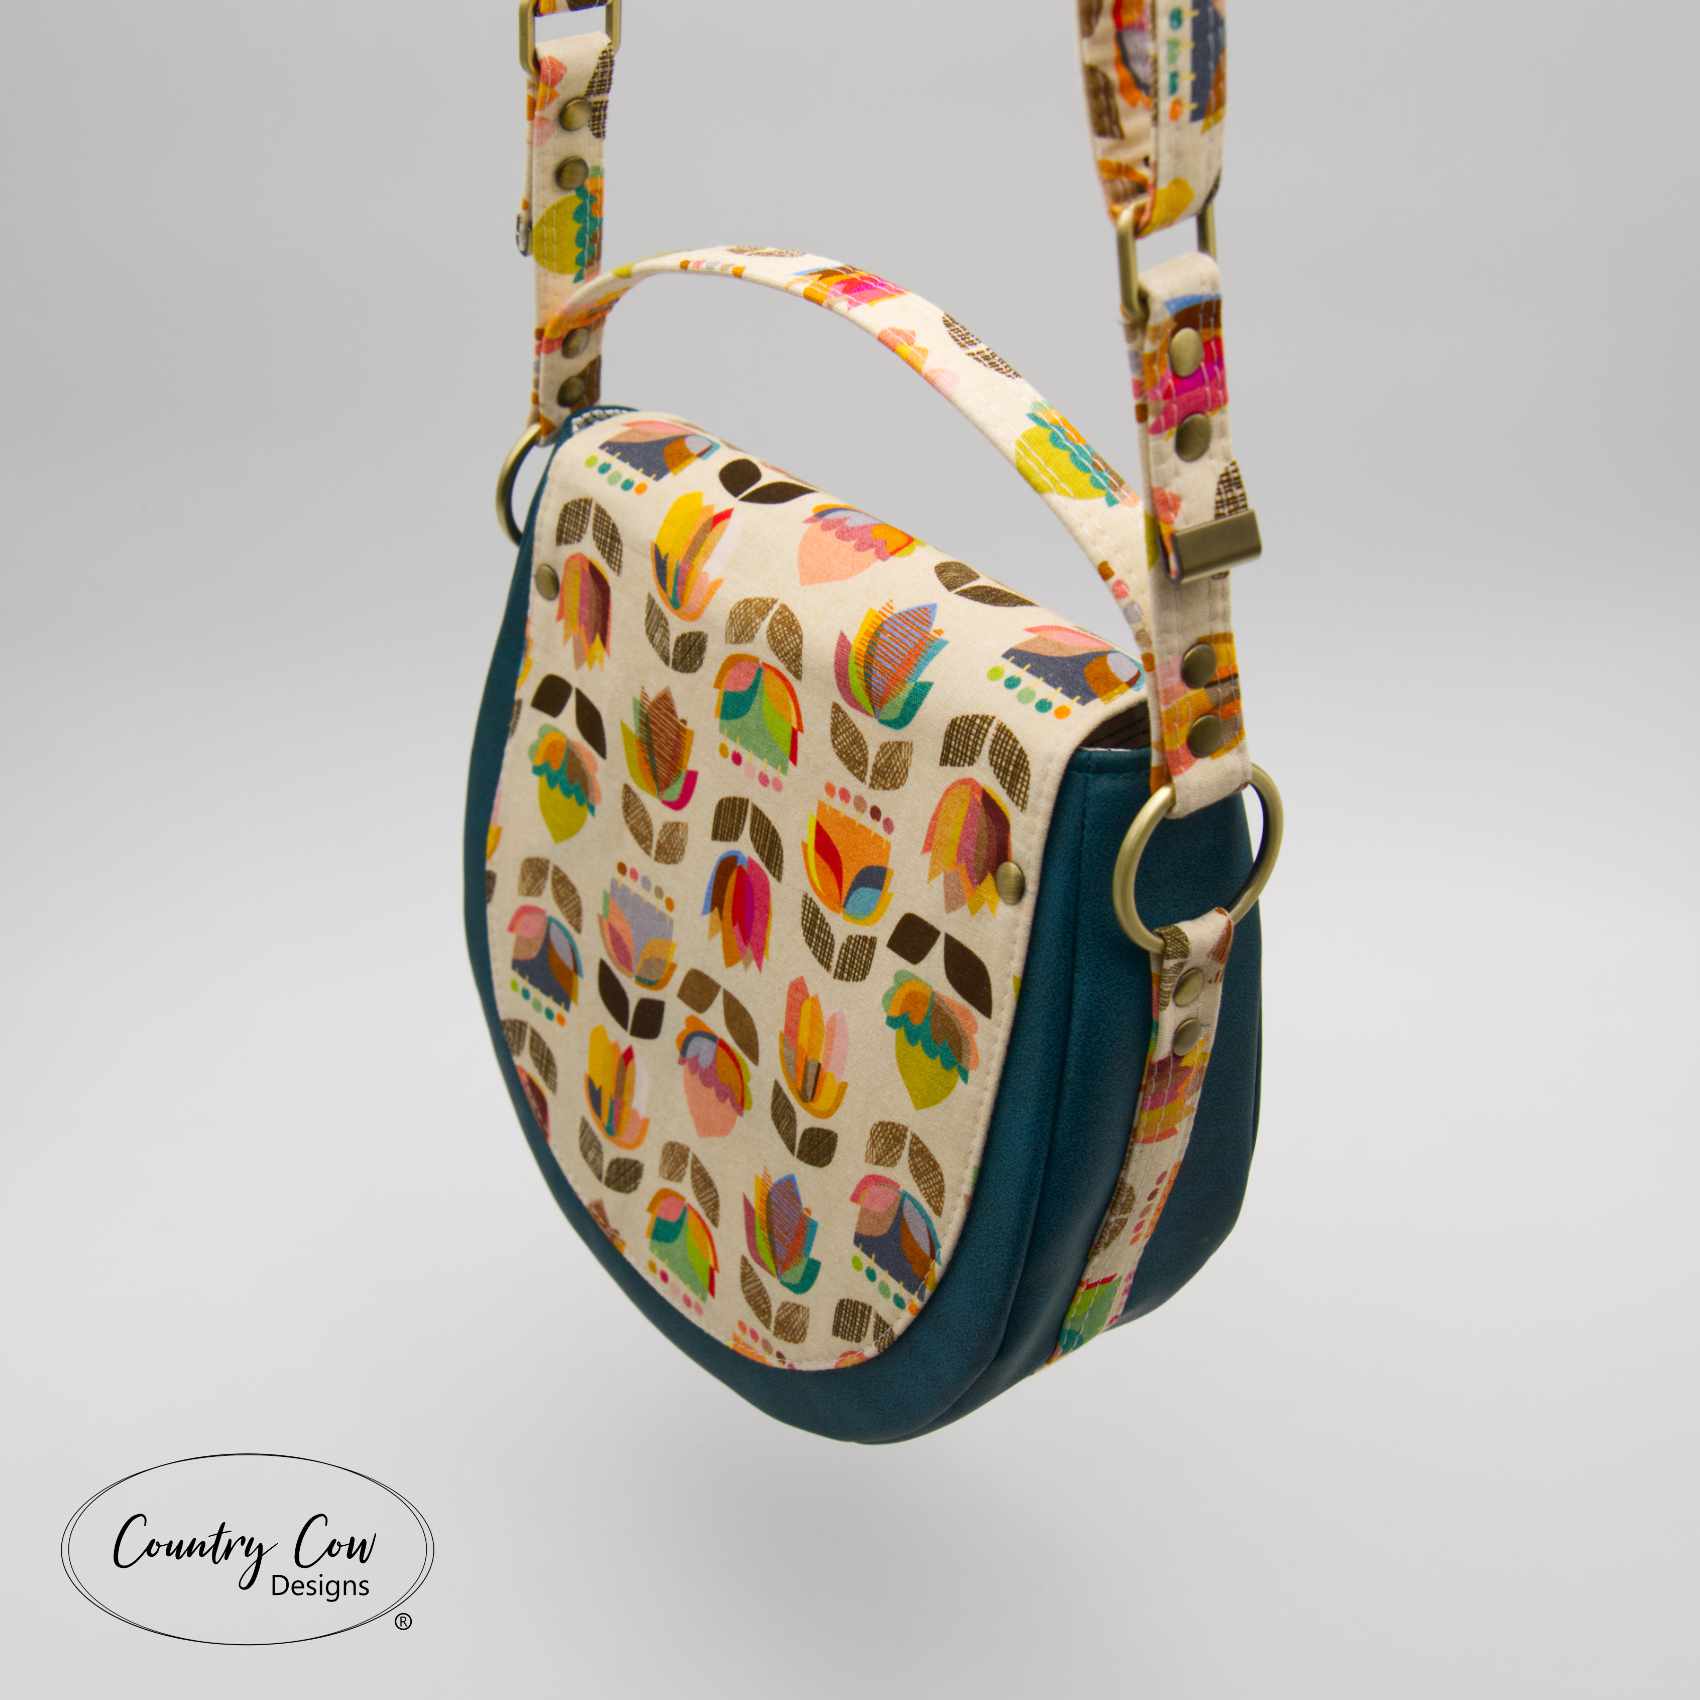
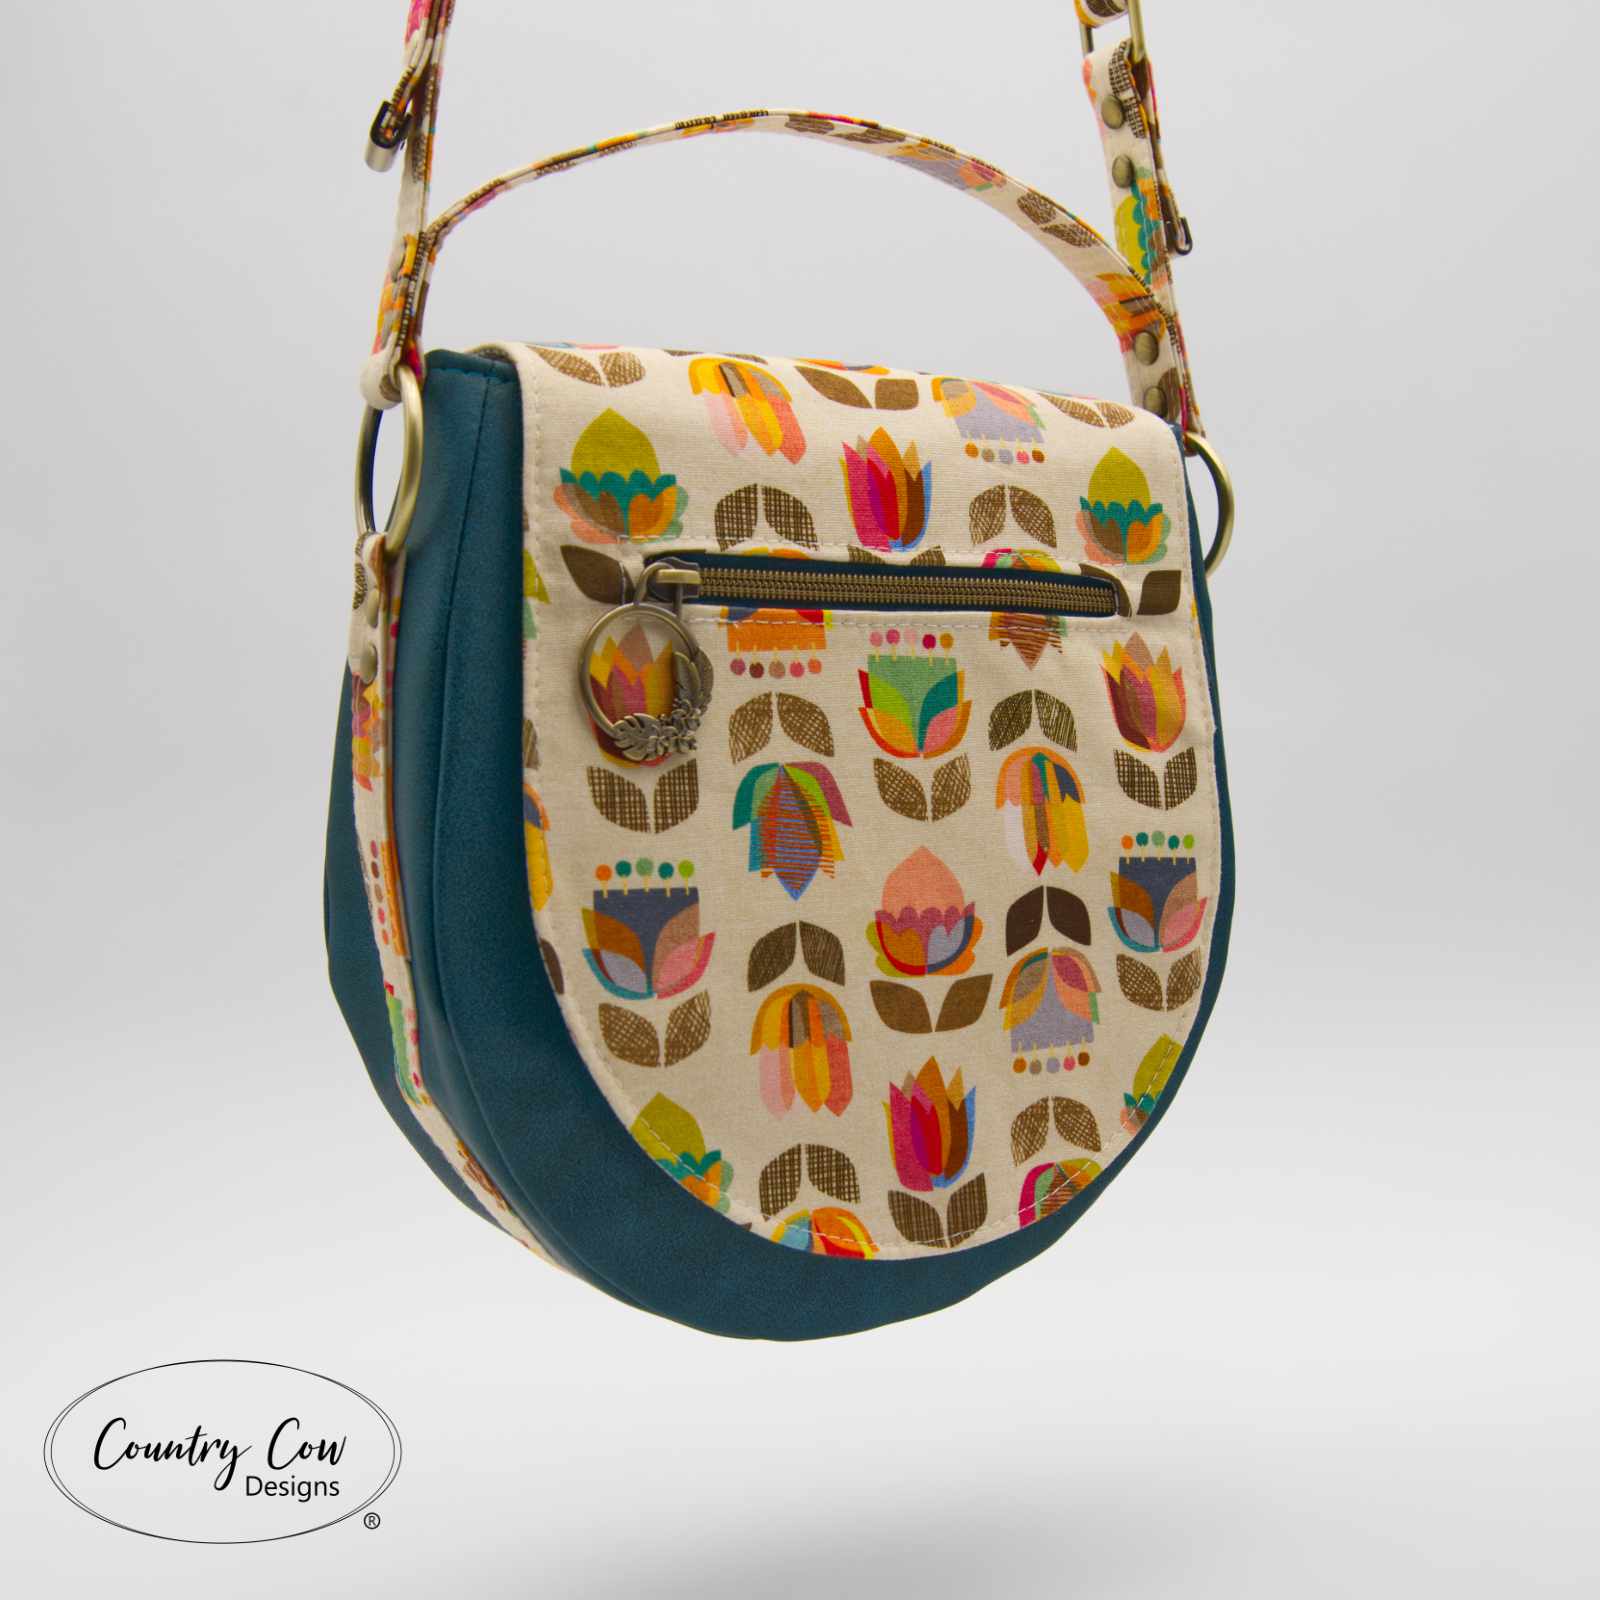
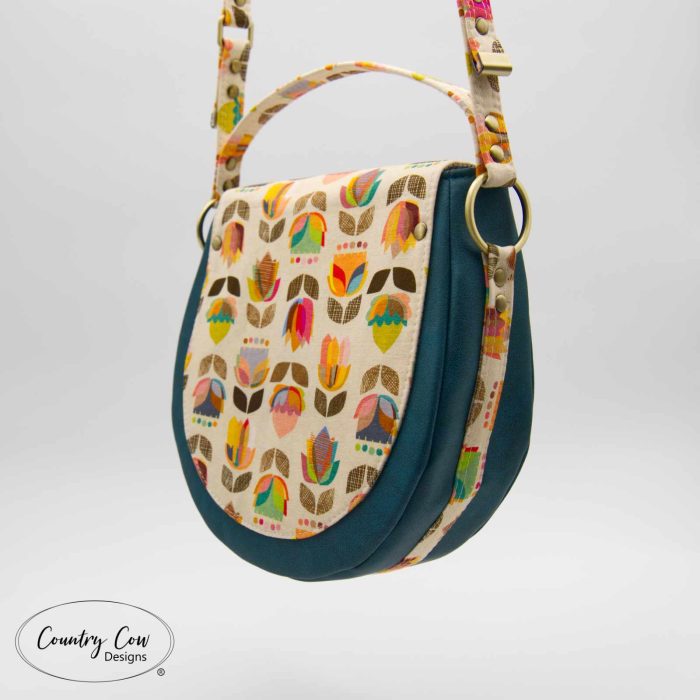
When Amy tested the Meridias pattern for us, she did a pattern hack and supplied us with the details so we can share it with you all. Here’s a quick guide on how to add a secret slip pocket to your Meridias bag, hidden behind the flap on the back of the bag. This pattern hack makes the flap a bit more fiddly to make, so I would recommend it as intermediate. We’re also going to move the flap zip pocket from the back of the bag to the front to ensure we don’t have pockets doubling up and getting bulky on the back of the bag.
For this pattern hack, you’ll need to have the Meridias pattern. You can purchase a copy here if you haven’t already. You’ll also need two extra rivets. This blog post contains affiliate links.
Instructions:
- Follow the pattern instructions to page 9 of the pattern.
- When you reach page 10, complete the first two steps to fit the magnetic snap and then stop.
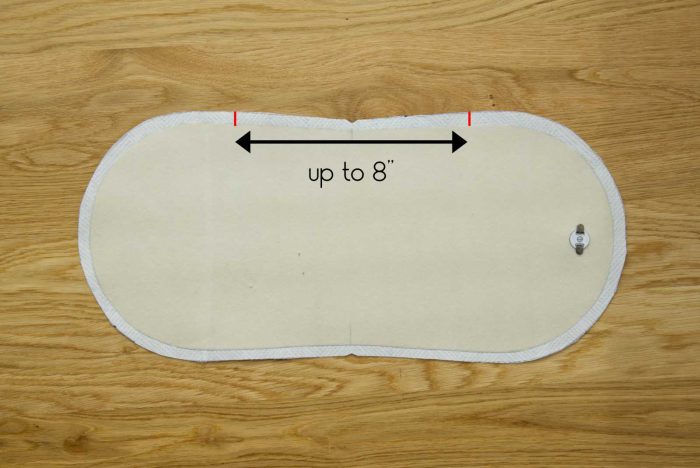
- On the lining flap piece, measure and mark a turning gap on one long edge. This can be anything up to 8″, but needs to be large enough for you to turn the flap out. The size needed will depend on the type and stiffness of fabrics you’re using. For example, vinyl will need a bigger turning gap than cotton. Make sure the centres of the flap are also marked.
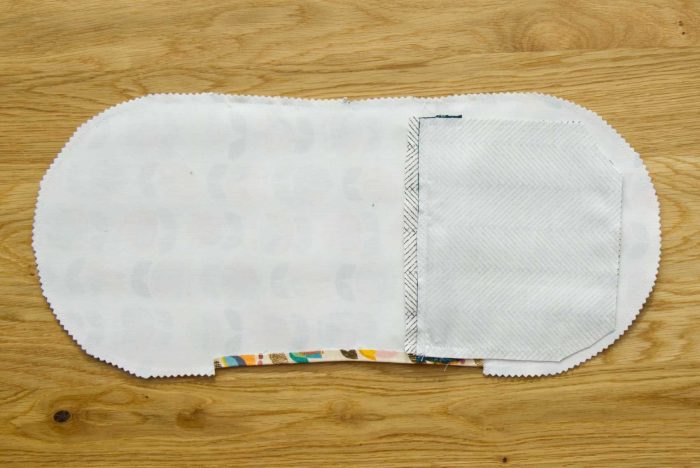
- Clip the lining and exterior flap pieces RST. Make sure the magnetic snap is together with the exterior zip pocket. This will ensure the flap zip pocket is on the front of the bag when it’s finished.
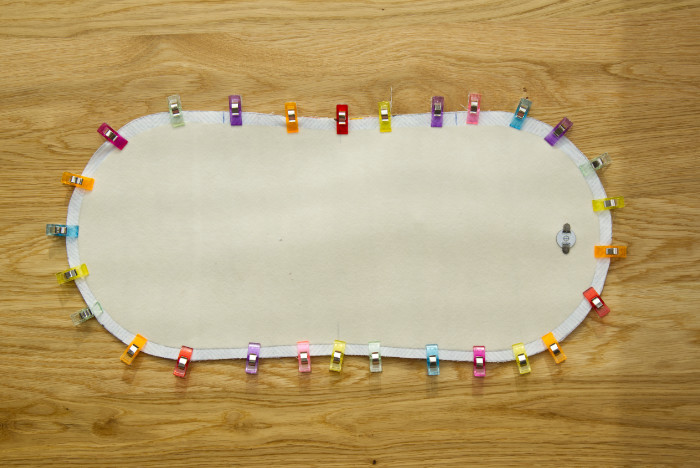
- Sew the flap, starting from the edge where your turning gap is marked, and finishing on the other side of the turning gap. Where the turning gap marks are, you’re sewing a straight line to the edge of the flap. As you sew the flap, you should be sewing around the very edge of the stabiliser. Use a zip foot to make this easier and make sure you get a really neat curve on your flap. Backstitch well at the beginning and end.
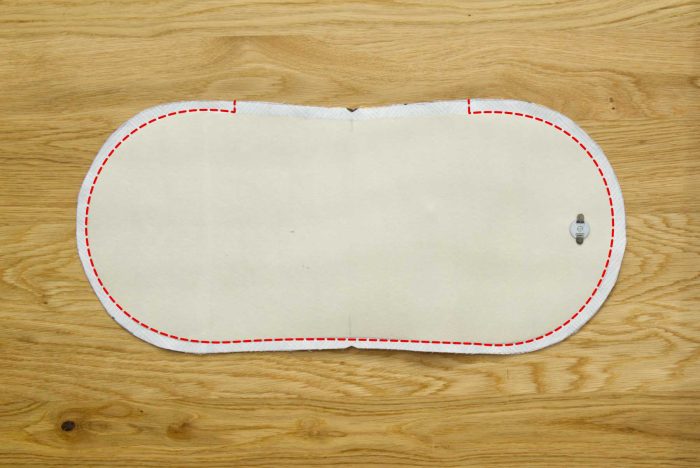
- Snip into the lining and exterior fabrics right where the turning gap is, right next to your stitch line. Be very careful not to cut through the stitches and not to cut further than the seam allowance.

- With the lining side of the flap facing you, place some double sided tape (DST) along the edge of the stabiliser between the turning gap.
- Fold the lining turning gap back and stick it in place using the DST. The stabiliser will make it easy to get a nice neat finish and ensure it’s shaped correctly.
- Flip the flap over and repeat with the exterior. This side will be a little harder to shape as there’s no stabiliser, so fold it to match the lining fabric. Take your time as this will make a big difference to how the finished flap looks. If you have pinking shears, trim the seam allowance of the flap (but not the turning gap). If not, use a small pair of scissors to cut little triangles into the curves. This will help the curves seat neatly once we turn the flap out.
- With the lining on top again, place some DST onto the folded turning gap.
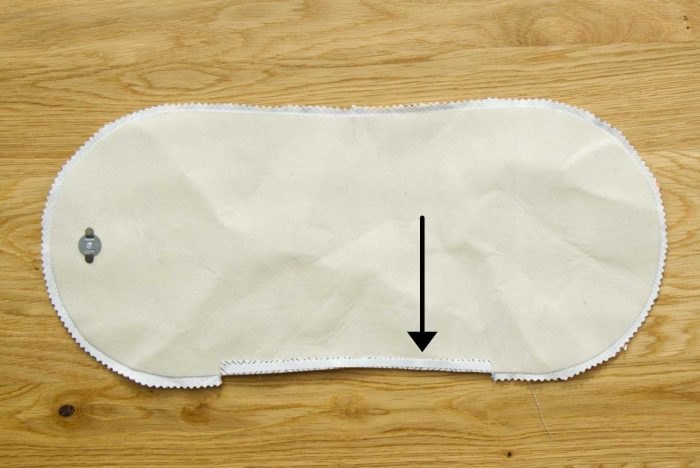
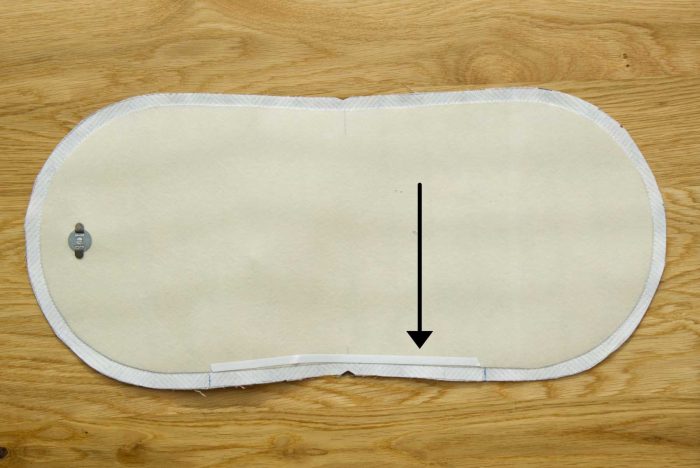
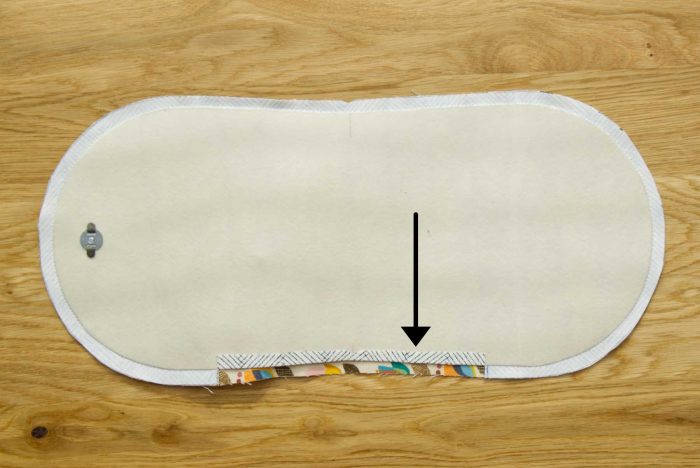
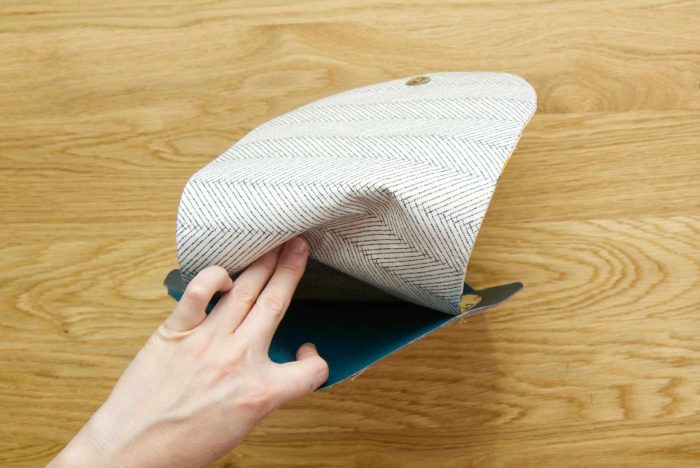
- Turn the flap right side out. Be careful not to tear the stitching on the turning gap. Use a turning tool to push out the curves out for a neat finish. Press it all with an iron (if your fabrics allow). Then use the DST to hold the turning gap closed. The clips in the image show where the turning gap is.

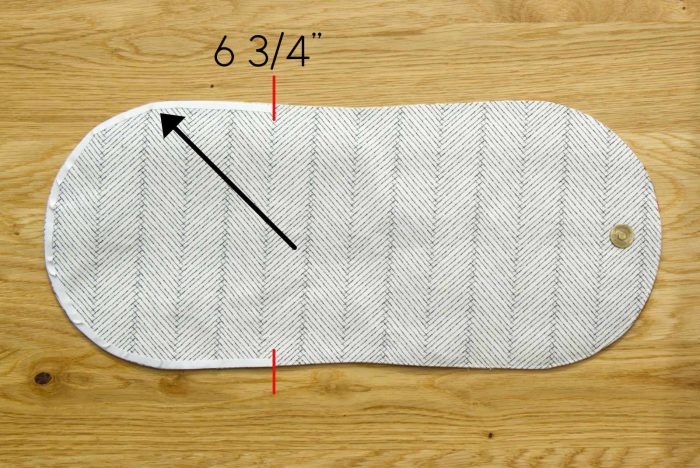
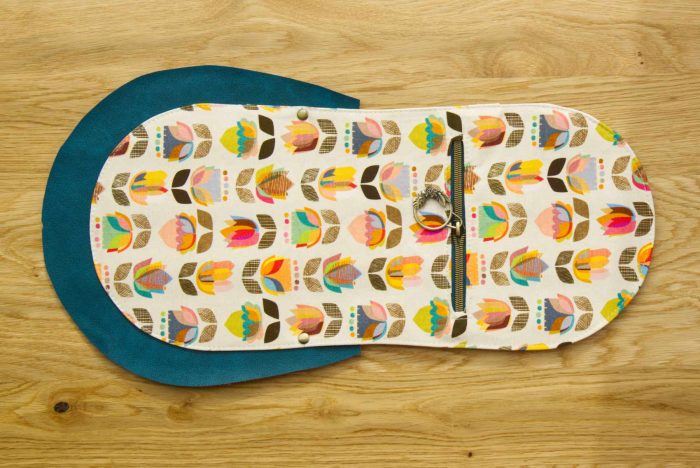
- Use an erasable pen to mark the edges, 6 3/4″ up from the bottom of the back of the flap. This is the edge without the zip pocket. Topstitch the flap on the zip pocket side of the marks, starting and stopping at each mark.

- Flip the flap over so you’re looking at the lining. Place some DST around the curve on the back of the flap, starting and stopping at the 6 3/4″ marks you just used for the topstitching. The DST is on the other side of the topstitching so it won’t be sat on the topstitching.
- Place an exterior back main panel RSU. Place the flap exterior RSU on top, 1 1/2″ up from the bottom edge and centred. Use the DST to hold it in place. Sew the flap down between the 6 3/4″ marks, using 1/8″ SA so it matches the topstitching on the rest of the flap. Backstitch well at the beginning and end.
- There should now be a slip pocket between the flap and the main panel.
- Where the 6 3/4″ marks are, fit a rivet approximately 1/2″ in from the edge of the flap on each side. This will give extra reinforcement to the pocket as the flap will get a lot of use.
And that’s it, you’re all done with the pattern hack. Continue using the Meridias pattern from page 12. Have fun!
If you want to hear first when we have new pattern hacks and new sewing patterns, join the Country Cow Designs mailing list!
SAC MERIDIAS – ASTUCE DE POCHE PLAQUÉE CACHÉE
Ecrit par Jo Kay (Country Cow Designs) sur 9 novembre 2023. Publié dans Blog.
Vous savez tous à quel point j’aime les sacs d’Amy de BedHogShop! Quand Amy a testé le patron Méridiades pour nous, elle a fait un changement de patron et nous a fourni les détails afin que nous puissions le partager avec vous tous. Voici un guide rapide sur la façon d’ajouter une poche secrète à votre sac Meridias, cachée derrière le rabat à l’arrière du sac. Cette astuce de patron rend le rabat un peu plus délicat à faire, je le recommanderais donc comme intermédiaire. Nous allons également déplacer la poche zippée de rabat de l’arrière du sac vers l’avant pour nous assurer que nous n’avons pas de poches qui se doublent et deviennent encombrantes à l’arrière du sac.
Pour cette astuce de patron, vous aurez besoin du patron Meridias. Vous pouvez en acheter un exemplaire ici si vous ne l’avez pas déjà fait. Vous aurez également besoin de deux rivets supplémentaires. Cet article de blog contient des liens d’affiliation.
INSTRUCTIONS:
- Suivez les instructions du patron jusqu’à la page 9 du patron.
- Lorsque vous atteignez la page 10, effectuez les deux premières étapes pour installer la pression magnétique, puis arrêtez-vous.
- Sur le rabat de doublure, mesurez et marquez une ouverture sur un long bord. Cela peut aller jusqu’à 8″, mais doit être suffisamment grand pour que vous puissiez retourner le rabat sur l’endroit. La taille nécessaire dépendra du type et de la rigidité des tissus que vous utilisez. Par exemple, le simili aura besoin d’une plus grande ouverture que le coton. Assurez-vous que les centres du rabat sont également marqués.
- Clipsez les pièces de rabat extérieures et intérieures endroit contre endroit. Assurez-vous que la pression magnétique soit du même côté que la poche extérieure zippée. Cela garantira que la poche zippée à rabat se trouve à l’avant du sac lorsqu’il est terminé.
- Cousez le rabat, en commençant par le bord où votre ouverture est marquée, et en terminant de l’autre côté de l’ouverture. Là où se trouvent les marques d’ouverture, vous cousez une ligne droite jusqu’au bord du rabat. Lorsque vous cousez le rabat, vous devez coudre autour du bord de l’entoilage. Utilisez un pied-de-biche pour fermeture éclair pour faciliter cela et assurez-vous d’obtenir une courbe vraiment soignée sur votre rabat. Bien faire un point d’arrêt début et à la fin.
- Crantez dans les tissues de doublure et d’extérieurs juste à l’endroit où se trouve l’ouverture, juste à côté de votre ligne de couture. Faites très attention à ne pas couper à travers les points et à ne pas couper plus loin que la marge de couture.
- Avec le côté doublure du rabat face à vous, placez du ruban adhésif double face le long du bord de l’entoilage au niveau de l’ouverture.
- Pliez les bords au niveau de l’ouverture vers le centre du rabat et collez en place à l’aide du scotch double face. L’entoilage permettra d’obtenir facilement une belle finition soignée et de s’assurer qu’il est correctement formé.
- Retournez le rabat et répétez l’opération avec l’extérieur. Ce côté sera un peu plus difficile car il n’y a pas d’entoilage, alors pliez-le pour qu’il corresponde au tissu de la doublure. Prenez votre temps, car cela fera une grande différence dans l’apparence du rabat fini. Si vous avez des ciseaux cranteurs, coupez la marge de couture du rabat (mais pas au niveau de l’ouverture). Si ce n’est pas le cas, utilisez une petite paire de ciseaux pour découper de petits triangles dans les courbes. Cela aidera les courbes à s’asseoir proprement une fois que nous aurons tourné le rabat.
- Avec la doublure vers vous, placez un peu de scotch double face au niveau de l’ouverture.
- Retournez le rabat sur l’endroit. Veillez à ne pas déchirer les coutures au niveau de l’ouverture. Utilisez un outil de tournage pour pousser les courbes vers l’extérieur pour une finition soignée. Repassez le tout avec un fer à repasser (si vos tissus le permettent). Utilisez ensuite du scotch double face pour maintenir l’ouverture fermé. Les clips de l’image montrent où se trouve l’ouverture.
- Utilisez un stylo effaçable pour marquer les bords, à 6 3/4″ du bas de l’arrière du rabat. Il s’agit du bord sans la poche zippée. Surpiquez le rabat du côté de la poche zippée entre les marques, en commençant et en arrêtant à chaque marque.
- Retournez le rabat pour regarder la doublure. Placez un peu de scotch double face autour de la courbe à l’arrière du rabat, en commençant et en vous arrêtant aux marques de 6 3/4″ que vous venez d’utiliser pour les surpiqûres. Le scotch double face est de l’autre côté de la surpiqûre, il ne sera donc pas posé sur la surpiqûre.
- Placez un panneau extérieur principal endroit vers vous. Placez le rabat dessus, extérieur vers vous, à 1 1/2″ du bord inférieur et au centre. Utilisez le scotch double face pour le maintenir en place. Coudre le rabat entre les marques de 6 3/4″, en utilisant une marge de couture de 1/8″ pour qu’il corresponde aux surpiqûres du reste du rabat. Bien faire un point d’arrêt au début et à la fin.
- Il devrait maintenant y avoir une poche plaquée entre le rabat et le panneau principal.
- À l’endroit où se trouvent les marques de 6 3/4″, installez un rivet à environ 1/2″ du bord du rabat de chaque côté. Cela donnera un renforcement supplémentaire à la poche car le rabat sera beaucoup utilisé.
Et voilà, vous en avez fini avec l’astuce du patron. Continuez à utiliser le patron Meridias à partir de la page 12. Amusez-vous !

I did the hack and it’s wonderful! Thankyou! Unfortunately I missed adding my logo to the front of the bag. It would be appreciated if you could remind some of us 😜 to add logos at the appropriate time and place.
A video for this would be something nice. I can’t wait to make this bag I think it’s so cool.
Please add me to mailing list
We’ve added you. You’ll be included from next week’s mailing list