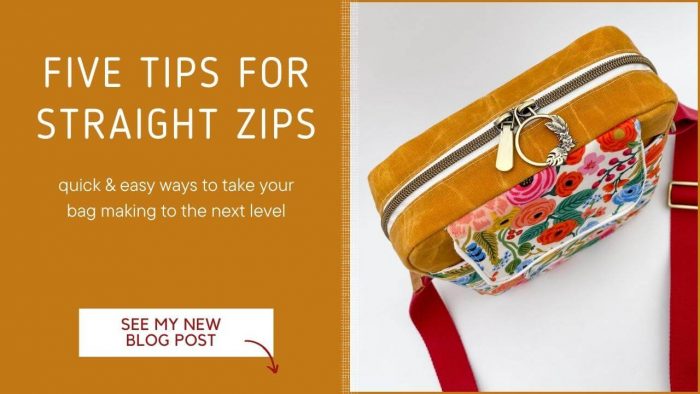
Zips make a big difference to the look of your finished bag. But how can you make sure you sew straight zips every time? Here are our top tips for straight zips. For the purpose of this blog post I’m referring to sewing continuous nylon zip tape into bags. These tips may still be helpful if you’re using metal or pre-made zips, but this post is not in reference to sewing zips into clothing, which is usually a very different process. Please note this post contains affiliate links.
1. Use Good Quality Zip Tape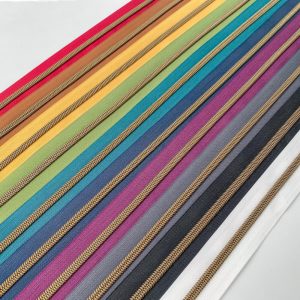
It’s really important to use high quality zip tape. Cheap zips are thinner and can often become wavy. This makes getting a nice finish more difficult, as they’ll stretch and move while you’re sewing them in place. Ultimately, you can end up with a wavy zipper that just won’t look good in your bag. High quality zip tape tends to be slightly thicker and will lay flat when sewn, this will help your finished bag look amazing with no extra effort. For an example of good quality zip tape, check out the tape we stock.
2. Use Wonder Clips Correctly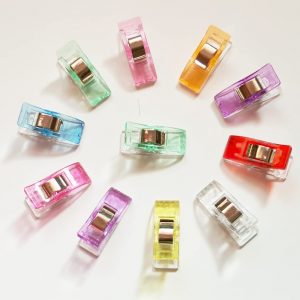
If you’re using wonder clips to hold your project together, make sure they’re all facing upward to sew straight zips. The top of wonder clips is slightly rounded whereas the underneath is flat. If you have some clips positioned with the rounded edge underneath, it will lift your project up slightly as it gets close to the needle. Although it’s a small movement, this can cause the fabrics or zip to shift slightly which will make a difference to your finished zip. Here’s an example of the wonder clips we use.
3. Don’t use a Zipper Foot
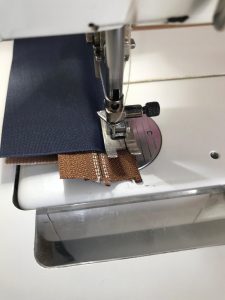
Zipper feet are great for some instances, particularly when you’re sewing zips into clothes and need a tight finish. But if you’re sewing zips into bags, where we tend to have a gap on either side of the zip teeth, a zipper foot can make the job harder. On most domestic machines, you can move the needle position from side to side.
Next time you’re sewing a zip, try using your standard presser foot butted up against the teeth of the zip. You can feel the location of the teeth through the fabric. Then move your needle to the position closest to the zip teeth. This will allow you to sew along the length of the zip with the presser foot up against the teeth. The teeth will guide the foot and ensure you get a perfectly straight stitch, approximately 1/4″ [7mm] from the teeth. It will also ensure that the space between the zip teeth and fabric will be equal on both sides of the zip, which makes your finished bag look fabulous. If you’re using an industrial machine, a narrow foot can have the same effect.
4. Baste One Side at a Time
I know it takes more time, but this is how you get a really neat finish. For example, when you’re sewing a zip gusset, baste the exterior piece to the zip first, then sew the lining piece onto the same side. It’s tempting to sew both pieces of fabric at once, but when you do, it’s more likely that something will shift and your zip won’t look as neat.
5. Press the Fabrics Thoroughly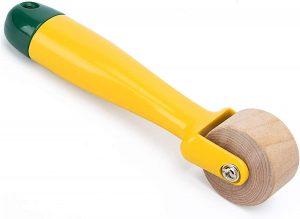
When the exterior and lining pieces are both fitted to the zip, you need to press them away from the zip so you can topstitch. Don’t rush this part. Press the fabrics thoroughly. If you’re using a fabric that can’t handle the heat, such as vinyl, waxed canvas or waterproof canvas, try using a seam roller or pressing with your fingers. If you press the fabrics thoroughly, you can ensure that the seam is completely straight and even on both sides of the zip before you topstitch. Here’s an example of the seam roller we use.
I hope you’ve picked up some useful techniques from this post. If you have additional tips for straight zips, we’d love to hear them. Please leave a comment below! If you enjoyed this post, sign up to our mailing list and keep updated with our weekly blog posts
Great tips! It took me a while to learn that NOT using a zipper foot really works!
Thanks for great tips
I am also a zipper foot addict. I have seen the above method used but have yet to try if out myself…🤔
thanks for this awesome tips. I’m definitely going to try the one without the zipper foot!
I’m all ready a convert to all your tips, but I still learnt something new with the wonder clips.
Great tips! I need all the help I can get!😊
Love all the tips, thanks. I have found that ironing the zip before installing is very helpful.
Thank you, these are great tips, as I don’t like the zipper foot.
It’s amazing how we think all zips should be sewn the same way. Thanks Jo for the reminder that not all zips are the same and that they should be treated differently.
Very interesting especially not using the zipper foot. Can’t wait to try it. Thankyou.
Mind blown about not using a zipper foot!!!! Using that tip on my next bag for sure — thank you!!!
I’ve watched your videos several times and heard your explanation on how you put in the zip tape. Just this week I installed my first #5 zip tape (ordered from you, of course) in my first ever gusseted bag. It went in perfectly and without a hitch. I was amazed at how straight the stitching was!! Thanks so much for showing that you can do sew much with a domestic machine!!
Great tips but should have read it sooner as I have just brought a zipper foot ☹