Scroll down for the French translation – Faites défiler l’écran vers le bas pour voir la traduction française de l’article.
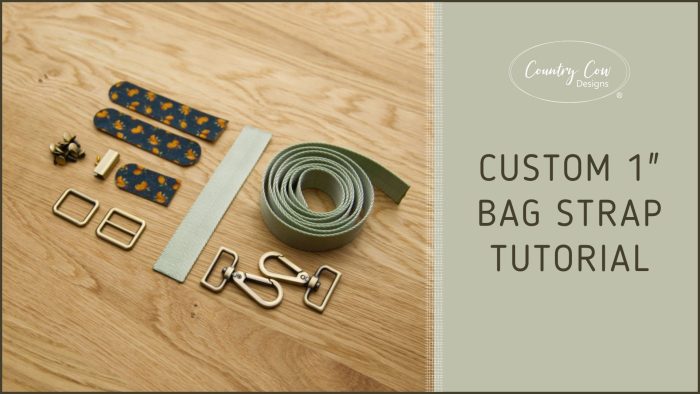
I like to add some extra details when making webbing bag straps, to give it a custom look. I’ve already shown one of my strap methods on a previous post using 1 ½” (3.8cm) webbing and then I made a video showing the same technique.
This time I’m going to show you how to make a custom strap using 1″ (2.5cm) webbing with leather or cork details. Comment below to let me know what bag you’re making your strap for!
To make this strap, you’ll need the following:
Materials Required for Your Webbing Bag Strap
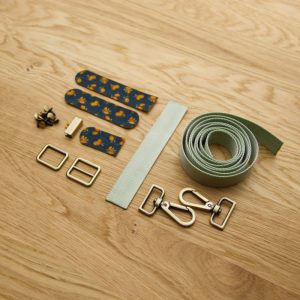
Leather or cork strips cut 1″ (2.5cm) wide as follows:
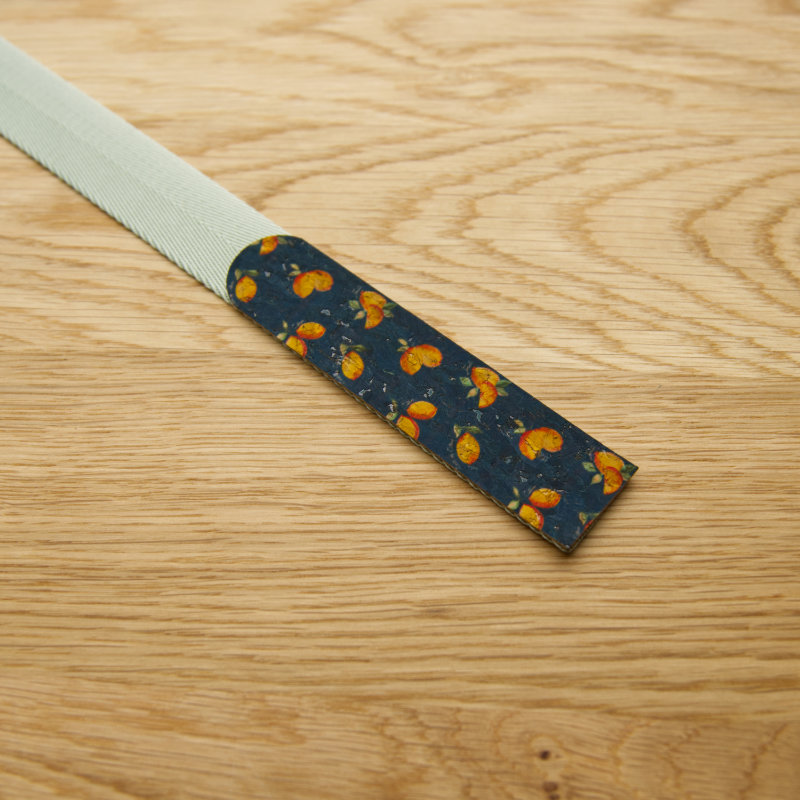
4” (10cm) long – curved both ends*
2” (5cm) long – curved one end*
4 1/2” (12cm long) – curved one end*
*The simplest way to curve the end of your cork or leather is using a template. For a template, you can use something round that you have around the house. Try a coin or the lid of a small bottle.
Webbing 1″ (2.5cm) wide cut as follows:
6″ (15cm)
60” (150cm)
Hardware:
Step 1 – First Hook and Rectangle Ring

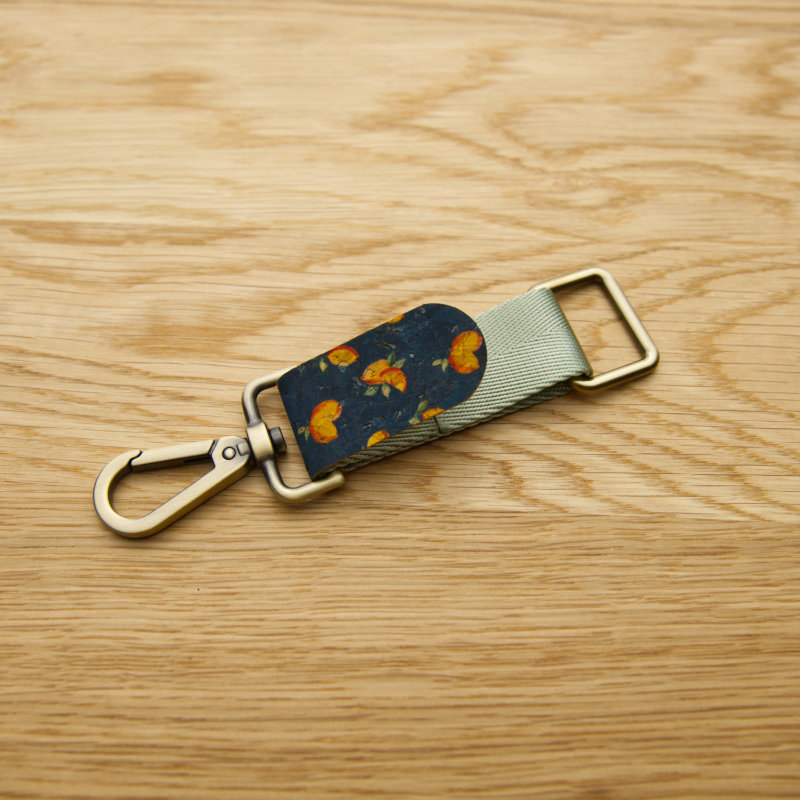
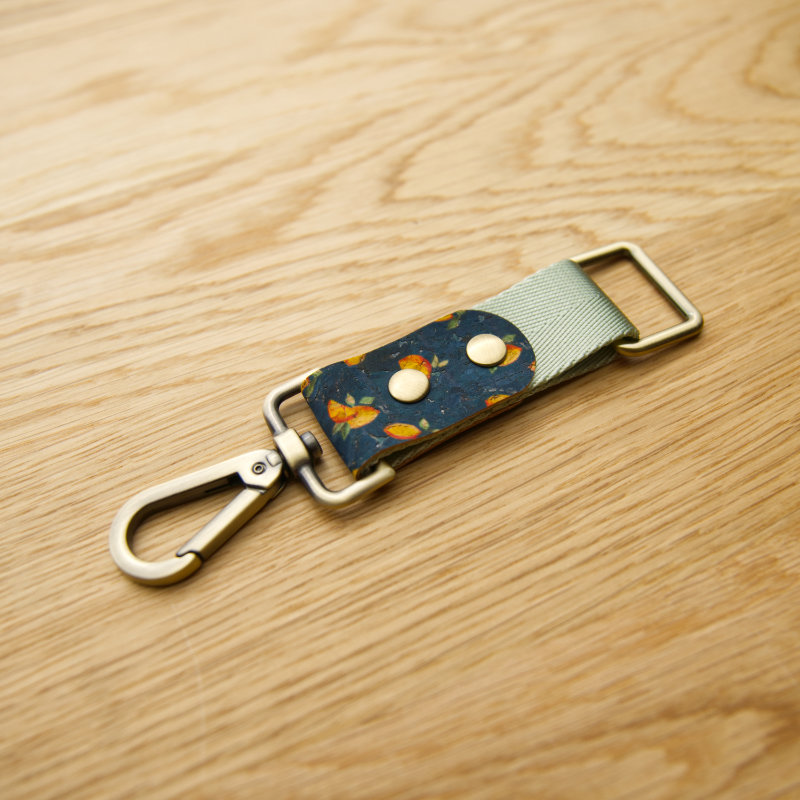
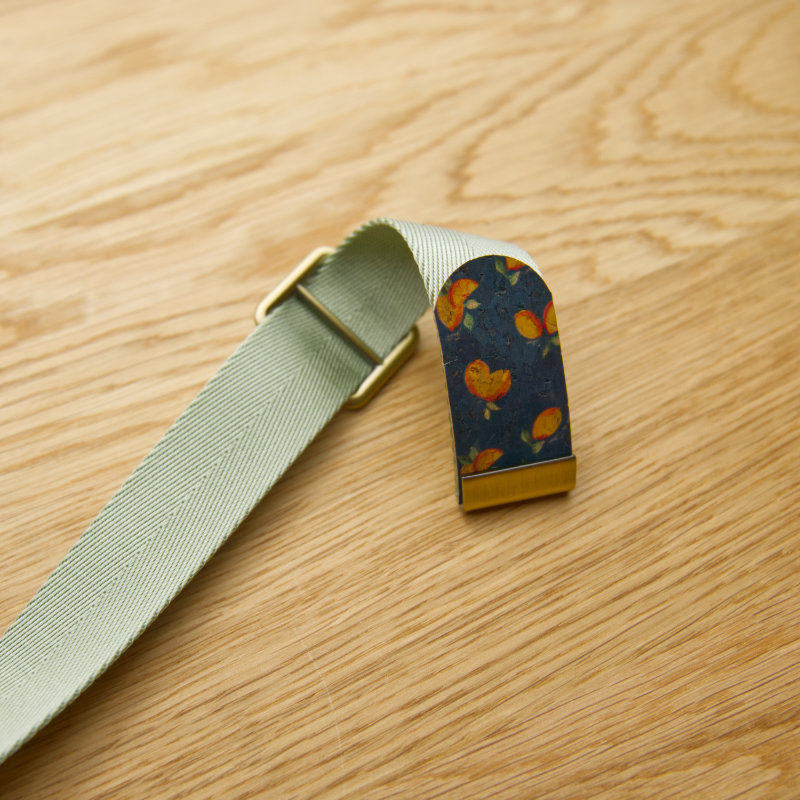
Take the 6″ (15cm) length of webbing and wrap it around one hook and the rectangle ring. The ends of the webbing are opposite sides as shown in the first image. Make sure the two ends of the webbing are 1″ (2.5cm) from the hook so they will be covered by the leather/cork accent. Use some glue to hold the webbing in place. Feed the leather/cork detail that has two curved edges through the hook and glue it in place, ensuring it’s even on both sides and is covering both raw edges of webbing. Punch two holes and fit rivets as shown in the third image.
Step 2 – Strap Slider


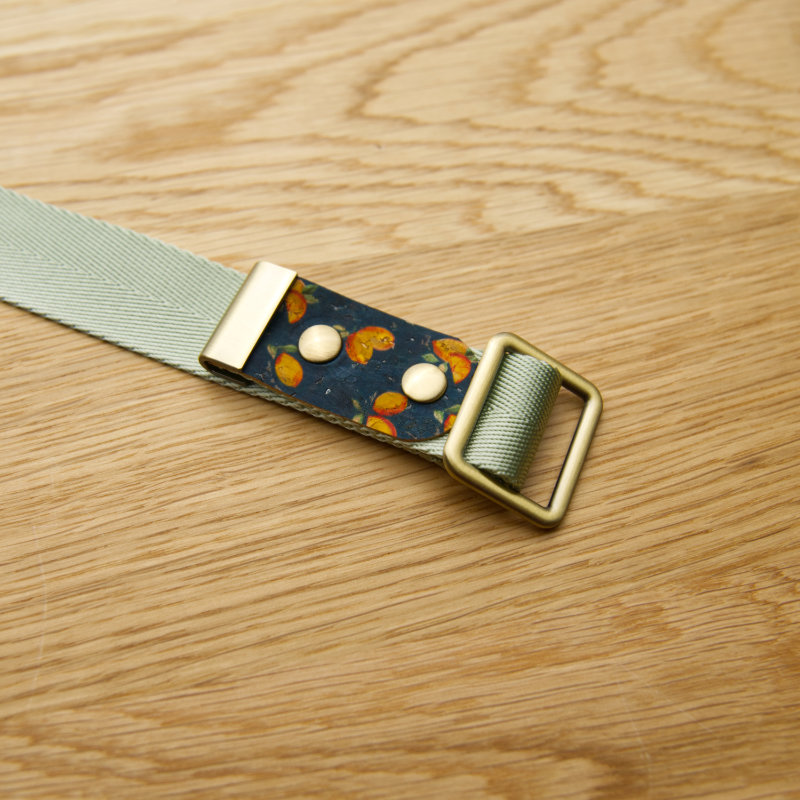

Take the 2” (5cm) leather/cork detail with one curved edge and glue it to the end of the long piece of webbing. Then wrap this end of the webbing around the centre bar of the slider, as shown in the second image. Fit a strap end to the end of the webbing. Add some glue to temporarily secure the webbing around the slider. The leather/cork accent should have it’s curved edge close to the strap slider but not touching it. Punch two holes and fit rivets as shown in the fourth image.
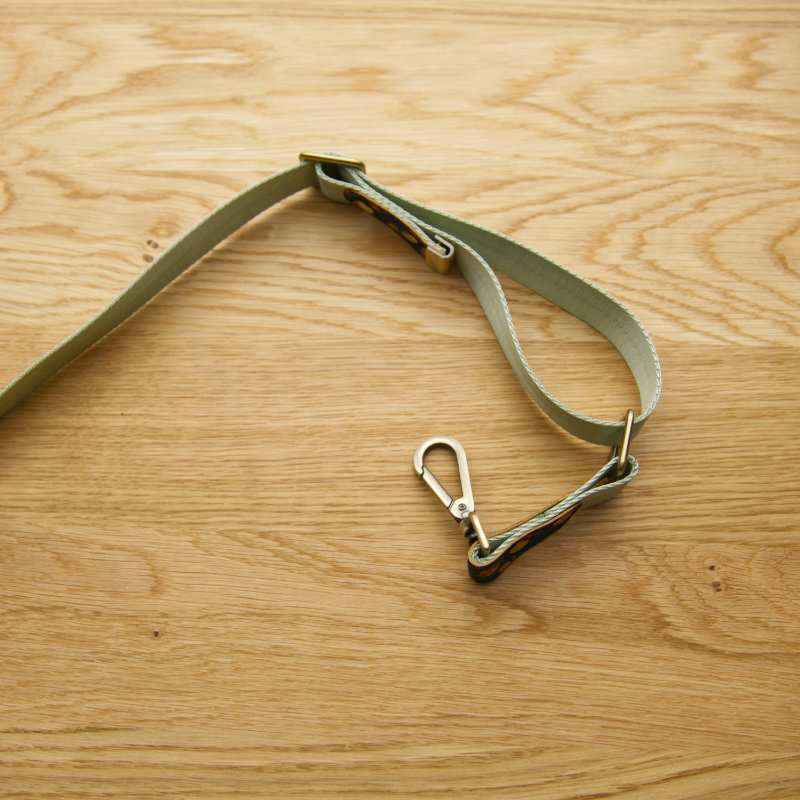
Feed the raw edge of the webbing through the rectangle ring from step 1. Then feed it back over the centre bar of the strap slider, as shown in the fifth and sixth images.
Step 3 – Final Hook and Completion


Glue the final leather/cork accent to the raw edge of the long webbing piece. Feed it through the final hook and attach a strap end, as shown in the second image. Temporarily secure the webbing to the hook with glue, then fit two rivets as shown in the third image.
You’re custom webbing bag strap is done!
This strap will be used for the bag Jo is making in her next video tutorial. She’ll be showing you how to make the Deskasow Organiser bag which is being released in September 2023. Make sure you’re subscribed to our mailing list so you get notified when the pattern is released.
I hope you enjoyed this short guide to making a custom bag strap. This strap would look amazing on a Lomexa handbag or one of our Teloujay crossbody bag patterns.

SANGLE DE SAC PERSONNALISÉE DE 1″ (2.5 Cm) – COMMENT FAIRE
Écrit par Adam Kay (Country Cow Designs Ltd) le 23 août 2023. Publié dans Blog.
J’aime ajouter quelques détails supplémentaires lors de la fabrication de sangles de sac, pour leur donner un aspect personnalisé. J’ai déjà montré une de mes méthodes de sangle sur un post précédent en utilisant une sangle de 1 1/2″ (3.8cm) et ensuite j’ai fait une vidéo montrant la même technique.
Cette fois, je vais vous montrer comment faire une sangle personnalisée en utilisant une sangle de 1″ (2.5 cm) avec des accents en cuir ou en liège. Commentez ci-dessous pour me faire savoir pour quel sac vous faites votre sangle !
Pour fabriquer cette sangle, vous aurez besoin des éléments suivants :
MATÉRIAUX REQUIS POUR LA SANGLE DE VOTRE SAC
BANDES DE CUIR OU DE LIÈGE COUPÉES 1“ (2.5CM) DE LARGE COMME CECI :
4″ (10cm) de long – incurvé aux deux extrémités*
2″ (5cm) de long – incurvé à une extrémité*
4 1/2″ (12cm de long) – incurvé à une extrémité*
*La façon la plus simple de courber l’extrémité de votre liège ou de votre cuir est d’utiliser un gabarit. Pour un modèle, vous pouvez utiliser quelque chose de rond que vous avez autour de la maison. Essayez une pièce de monnaie ou le bouchon d’une petite bouteille.
SANGLE DE 1“ (2.5CM) DE LARGE COUPÉ COMME CECI :
6″ (15cm)
60″ (150cm)
BOUCLERIE :
1 x 1″ (2.5cm) boucle de réglage
1 x 1″ (2.5cm) anneau rectangulaire
2 x 1″ (2.5cm) embouts de sangle
6 rivets moyens (poteau de 8 mm)
ÉTAPE 1 – PREMIER MOUSQUETON ET ANNEAU RECTANGULAIRE
Prenez la sangle de 6″ (15cm) de longueur et enroulez-la autour d’un mousqueton et de l’anneau rectangulaire. Les extrémités de la sangle sont des côtés opposés comme le montre la première image. Assurez-vous que les deux extrémités de la sangle sont à 1″ (2.5 cm) du mousqueton afin qu’elles soient recouvertes par l’accent cuir / liège. Utilisez de la colle pour maintenir la sangle en place. Enfilez l’accent de cuir / liège qui a deux bords incurvés à travers le mousqueton et collez-le en place, en veillant à ce qu’il soit à la même hauteur des deux côtés et couvre les deux bords bruts de la sangle. Poinçonnez deux trous et ajustez les rivets comme indiqué dans la troisième image.
ÉTAPE 2 – BOUCLE DE RÉGLAGE
Prenez l’accent de cuir / liège de 2″ (5cm) avec un bord incurvé et collez-le à l’extrémité du long morceau de sangle. Enroulez ensuite cette extrémité de sangle autour de la barre centrale de la boucle de réglage, comme indiqué dans la deuxième image. Installez un embout de sangle à cette extrémité de sangle. Ajoutez un peu de colle pour fixer temporairement la sangle autour de la boucle de réglage. L’accent cuir / liège doit avoir son bord incurvé près de la boucle de réglage mais ne pas la toucher. Poinçonnez deux trous et ajustez les rivets comme indiqué dans la quatrième image.
Enfilez le bord brut de la sangle à travers l’anneau rectangulaire de l’étape 1. Ensuite, enfilez-le sur la barre centrale de la boucle de réglage, comme indiqué dans les cinquième et sixième images.
ÉTAPE 3 – DERNIER MOUSQUETON ET FINITION
Collez le dernier accent de cuir/liège sur le bord brut de la longue sangle. Enfilez-la à travers le dernier mousqueton et attachez un embout de sangle, comme indiqué dans la deuxième image. Fixez temporairement la sangle au mousqueton avec de la colle, puis installez deux rivets comme indiqué dans la troisième image.
Votre sangle de sac de sangle personnalisée est terminée !
CETTE SANGLE SERA UTILISÉE POUR LE SAC QUE JO FERA DANS SON PROCHAIN TUTORIEL VIDÉO. ELLE VOUS MONTRERA COMMENT FABRIQUER LE SAC ORGANISATEUR DESKASOW QUI SORTIRA EN SEPTEMBRE 2023. ASSUREZ-VOUS D’ÊTRE ABONNÉ À NOTRE LISTE DE DIFFUSION AFIN D’ÊTRE AVERTI LORSQUE LE PATRON EST SORTI.
J’espère que vous avez apprécié ce petit guide pour fabriquer une sangle de sac personnalisée. Cette sangle aurait l’air incroyable sur un Sac à main Lomexa (disponible en français) ou l’un de nos Patrons de sacs à bandoulière Teloujay (disponible en anglais uniquement).
Awesome – another great blog and idea. I will totally do this. I have some leather strapping so will be purchasing the half-circle cutting tools from Amazon. Cutting the cork and faux leather with the tools will also work for this.
Perfect. The cutting tools make it so much easier
Certainly makes it look very professional. That you
Great tutorial. Your workmanship is always top notch. Thank you so much for sharing the techniques.
Thanks.